
How MyFence Builds Gates That Outlast Every Other Contractor
See how MyFence.com builds cedar gates with kiln-dried 2x4 frames, compression-fit diagonal braces, and 6-inch lag screws. Self-closing hardware is an optional upgrade, not standard.
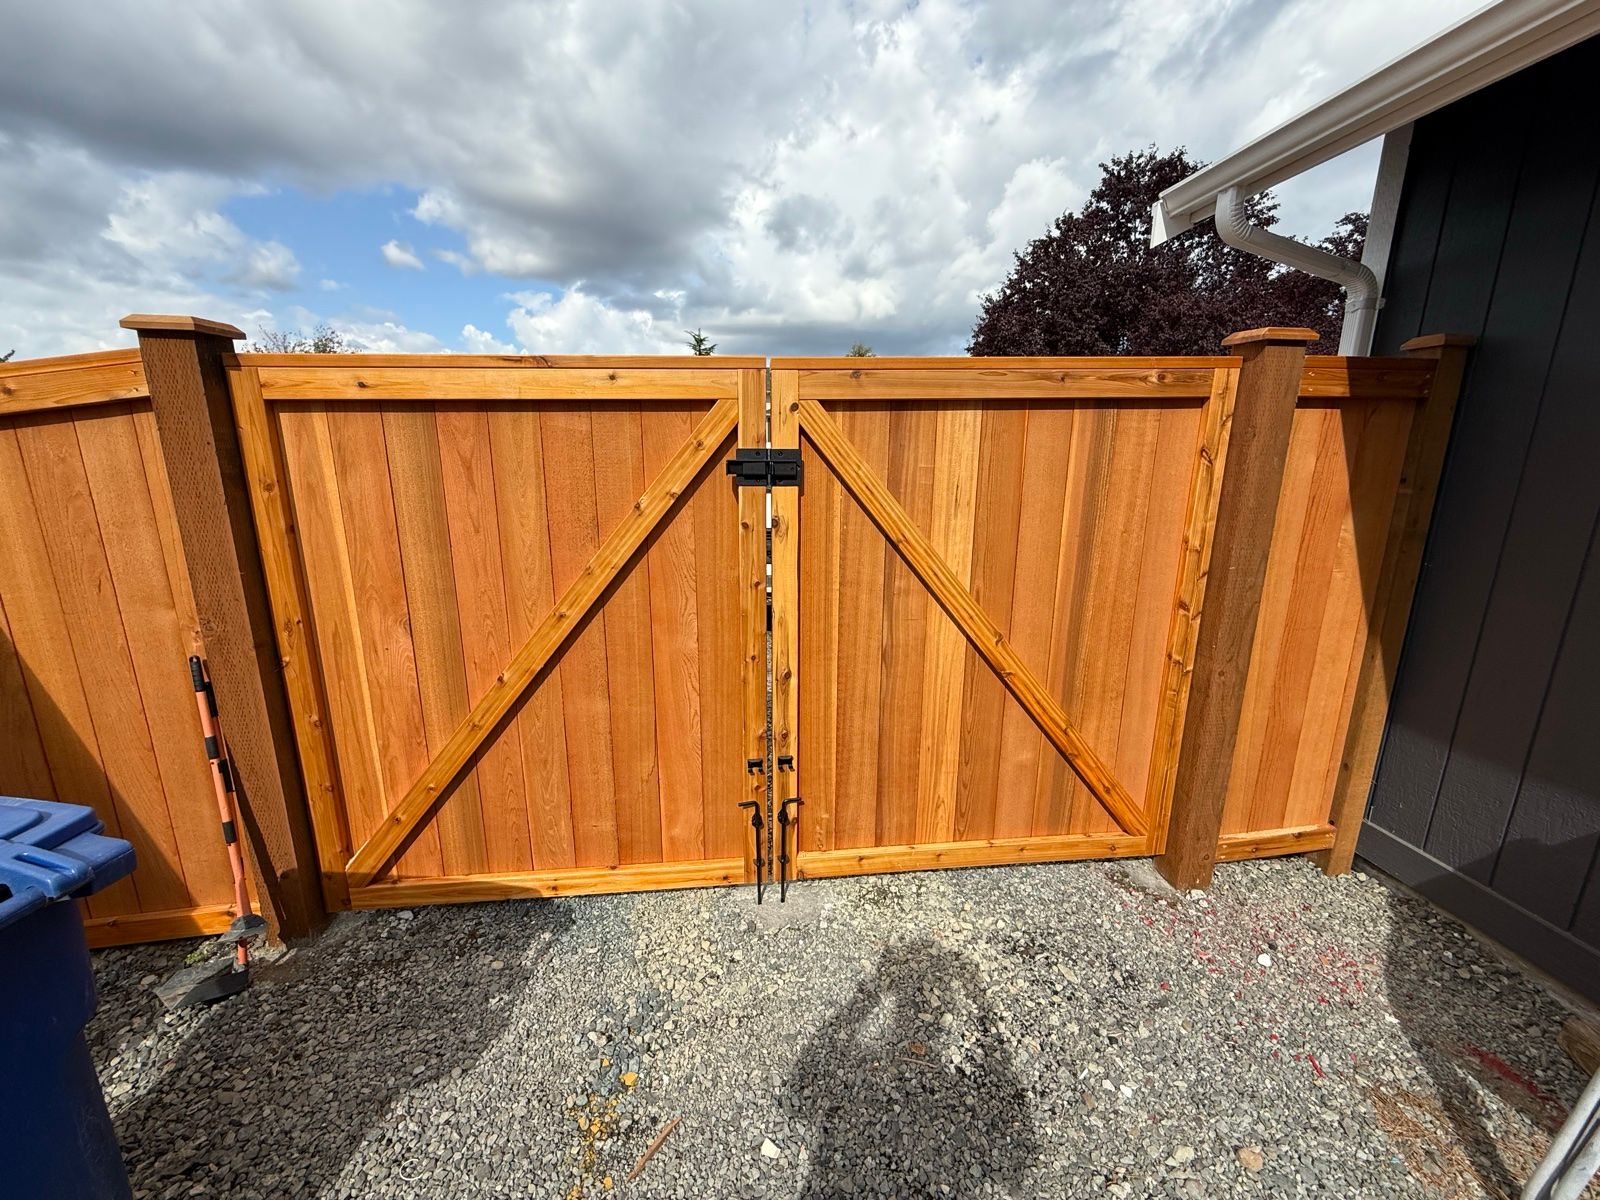
Every gate in the Pacific Northwest faces the same enemy: gravity, moisture, and time. Most contractors build gates the same way they did 20 years ago — a simple Z-frame with whatever lumber is cheapest that day. At MyFence, we build gates differently. We use kiln-dried cedar 2x4 frames, compression-fit diagonal braces, 6-inch and 8-inch lag screws, and hardware engineered for decades of smooth operation.
This article walks you through exactly how we build single gates and double gates that outlast the competition. We'll show you our frame construction, our concrete mounting methods, our hardware choices, and the compression vs. tension brace principle that most installers get wrong.
Why Most Contractor Gates Fail Within 3–5 Years
The standard gate construction across the Greater Seattle area is a Z-frame — two horizontal rails, a diagonal brace, and fence boards nailed or stapled to the face. It works for a season. Then the problems start.
A typical Z-frame uses a toe-nailed diagonal brace. That brace is generally under compression, though we often find it installed under tension instead. Which way it works depends on which side the hinges land.
A compression brace runs from the bottom of the hinge side up to the top of the latch side. The wood itself takes the load.
A tension brace runs the other way: from the top of the hinge side down to the bottom of the latch side. Then the whole job hangs on the fasteners that pin the diagonal to the frame. Those screws and nails often back out under pressure. Once they loosen, the gate sags, the latch misses, and you are lifting the gate to close it.
Real-world failure
The sagging-gate calls we get are often tension-brace jobs. The homeowner was told the gate "just needs adjusting." What it usually needs is a rebuild with a compression brace that is keyed into the frame — not a diagonal hanging on toenails.
The MyFence Gate Frame: Built Like Furniture, Not Fencing
Our gate construction starts with a full external 2x4 cedar frame with kiln-dried rails. Kiln-dried lumber has already shed most of its moisture, which means minimal shrinkage, twisting, and warping after installation. This is a significant upgrade over the green or air-dried lumber most contractors use.
Compression Bracing: The Critical Difference
The single most important detail in our gate frames is the diagonal brace angle. Our braces run down toward the hinge — not away from it. This places the brace under compression, not tension. When gravity pulls the gate down, the brace pushes back against the hinge post, transferring the load into the strongest part of the structure.
A good test for any gate: look at the diagonal brace. If it angles down toward the hinge, it's a compression brace. If it angles up toward the hinge, it's a tension brace — and it's working against itself.
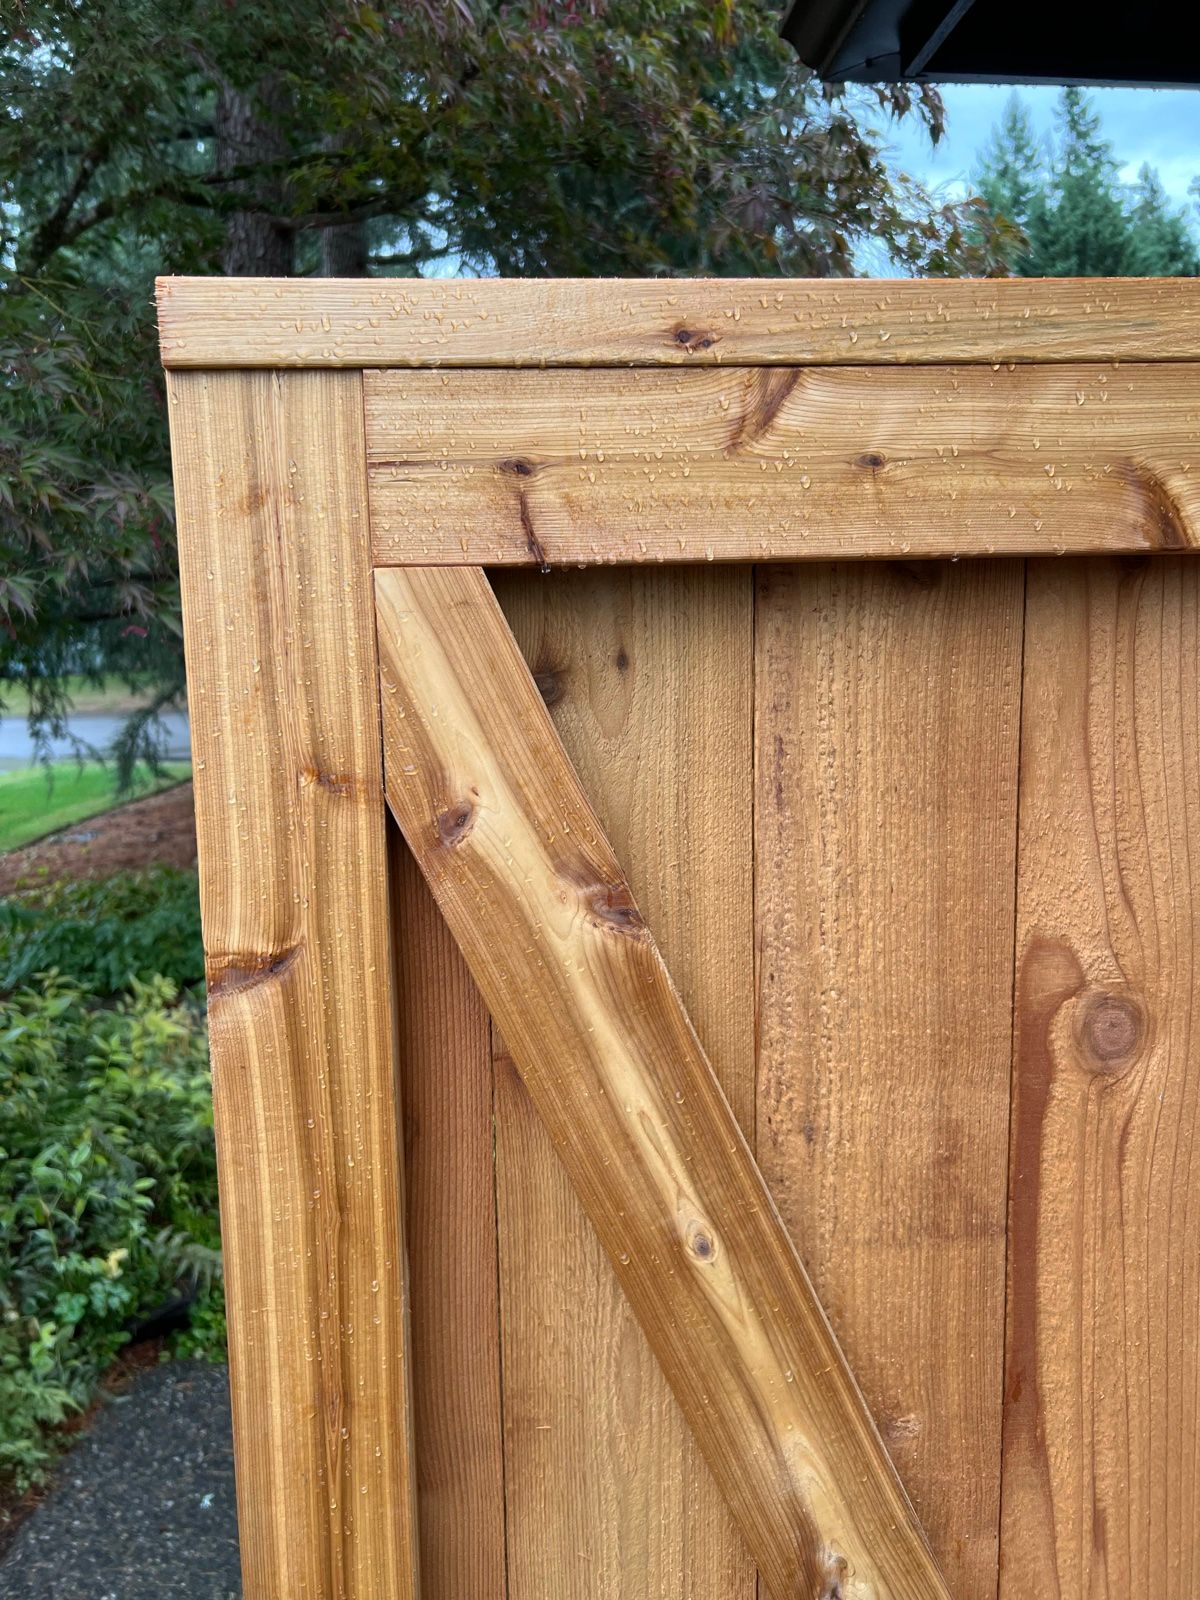
How We Assemble the Frame
Each gate frame is assembled on a flat workbench, not on-site. The horizontal rails and vertical stiles are joined with countersunk 6-inch lag screws for single gates, and 8-inch lag screws for double gates. These structural screws bite deep into the cedar, creating joints that won't loosen over time.
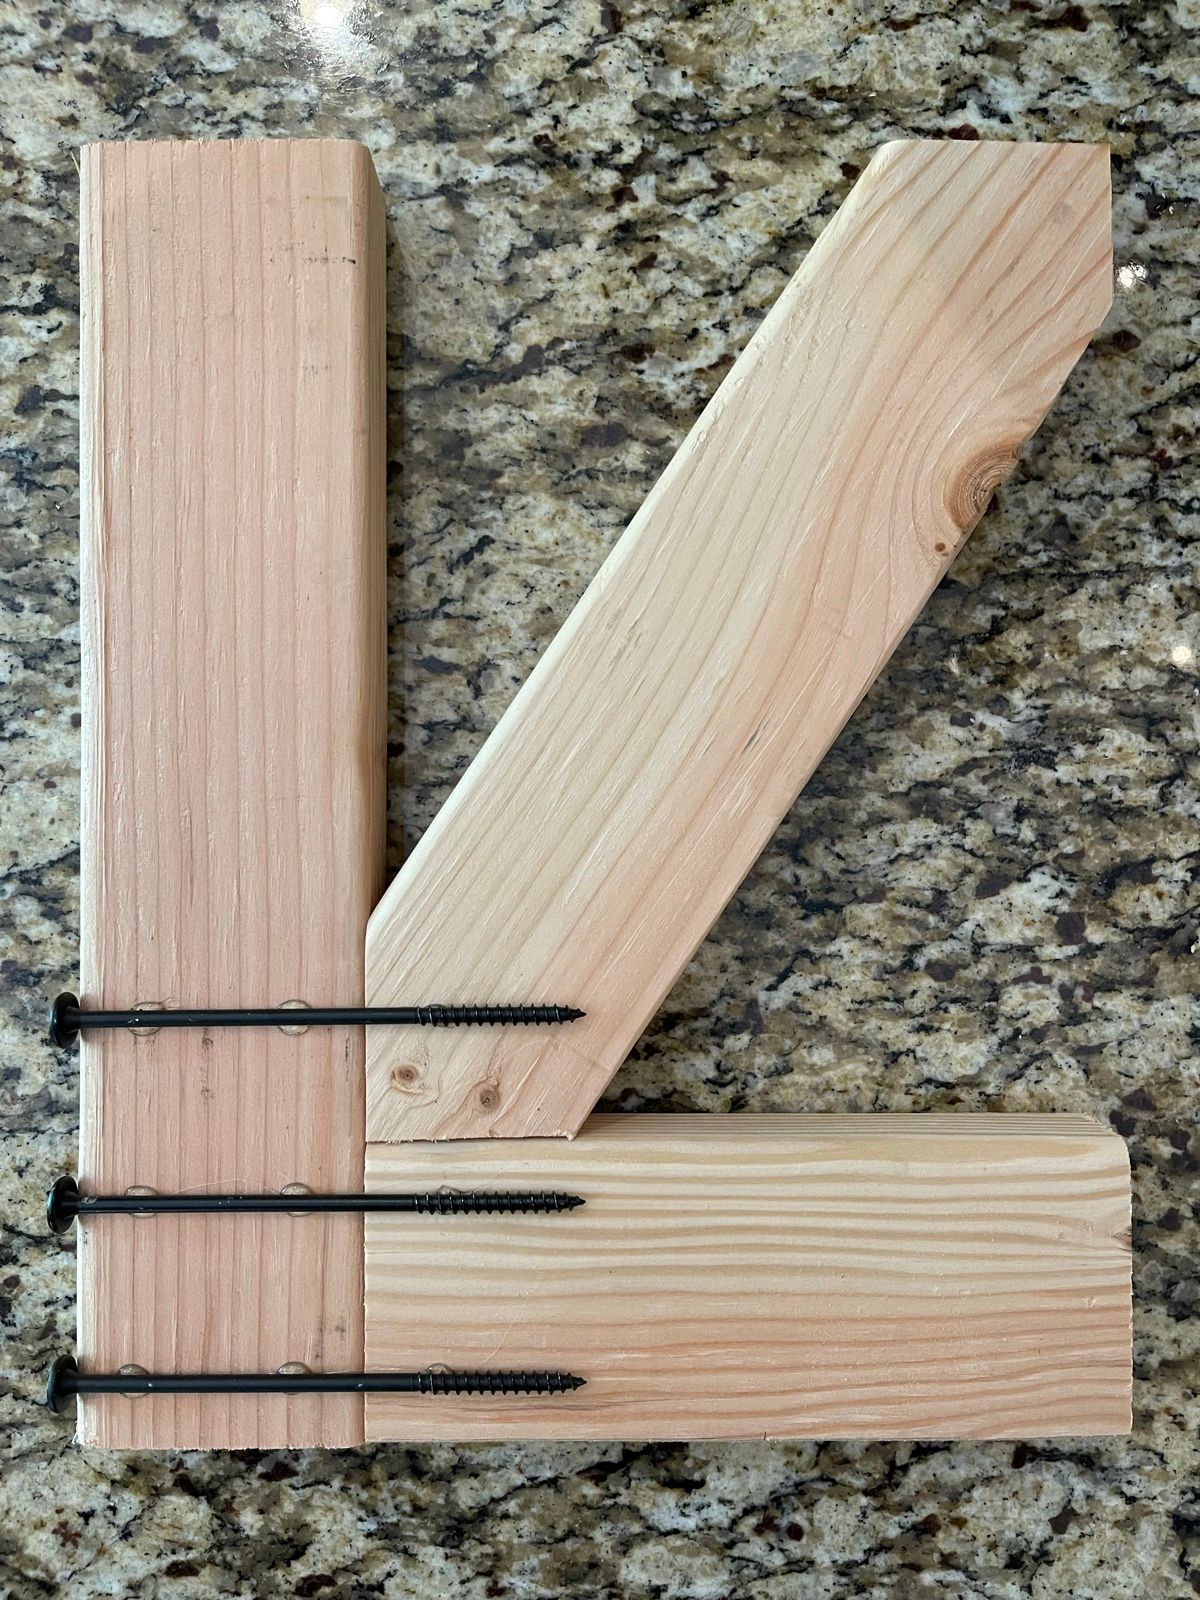
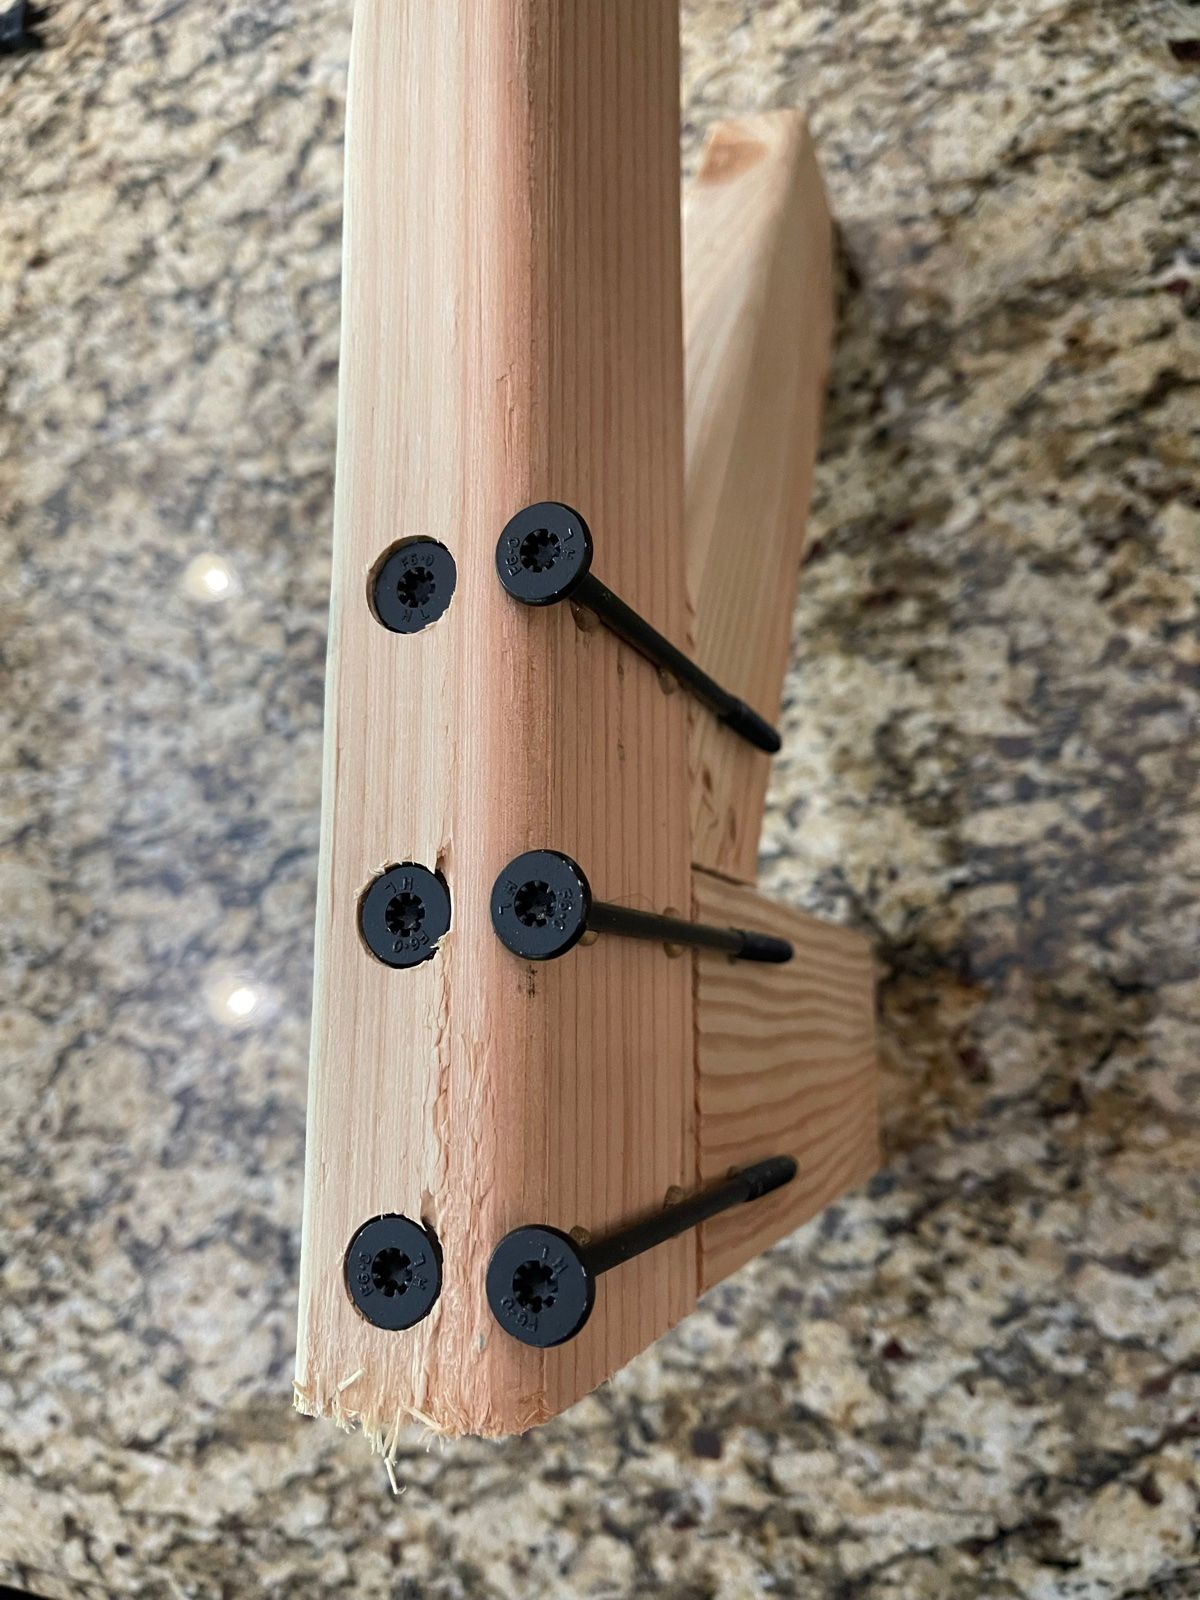
The diagonal brace is keyed in — entrapped within the frame, not just face-nailed. This means the brace bears directly against the rail and stile, creating a rigid triangle that resists racking from wind, kids swinging on the gate, or the daily stress of opening and closing.
Frame Construction Summary
| Component | MyFence Standard | Typical Contractor |
|---|---|---|
| Frame material | Kiln-dried cedar 2x4 | Green or air-dried 2x4 |
| Brace type | Compression, keyed in | Toe-nailed Z-brace (usually compression, often tension) |
| Fasteners | 6"–8" lag screws, countersunk | Deck screws or nails |
| Joint method | Bench-assembled, screwed | On-site nailed/stapled |
| Hardware | Heavy-duty black metal | Lightweight zinc |
Single Gate Construction
Our single gates are built to the same standard as our double gates — no shortcuts because the gate is smaller. The frame is a full perimeter of kiln-dried 2x4 cedar, with the diagonal brace running from the bottom hinge side to the top latch side (compression direction).
Watch: Cedar Gate Construction
We countersink 6-inch lag screws through the frame into the brace, creating a mechanical lock that won't back out. The fence boards are then attached to the face of the frame with stainless steel ring-shank nails, leaving the frame fully visible on the back side — clean, intentional, and built to be seen.
Pro tip
When you open a MyFence gate, look at the back. You should see a clean 2x4 cedar frame with the diagonal brace keyed into the corners — not a mess of angled nails and scrap lumber.
Single Gate Hardware
Hardware is where most contractors cut costs. We don't. Every single gate we install gets the following as standard hardware:
- Heavy-duty black metal hinges — not lightweight zinc that rusts within two seasons
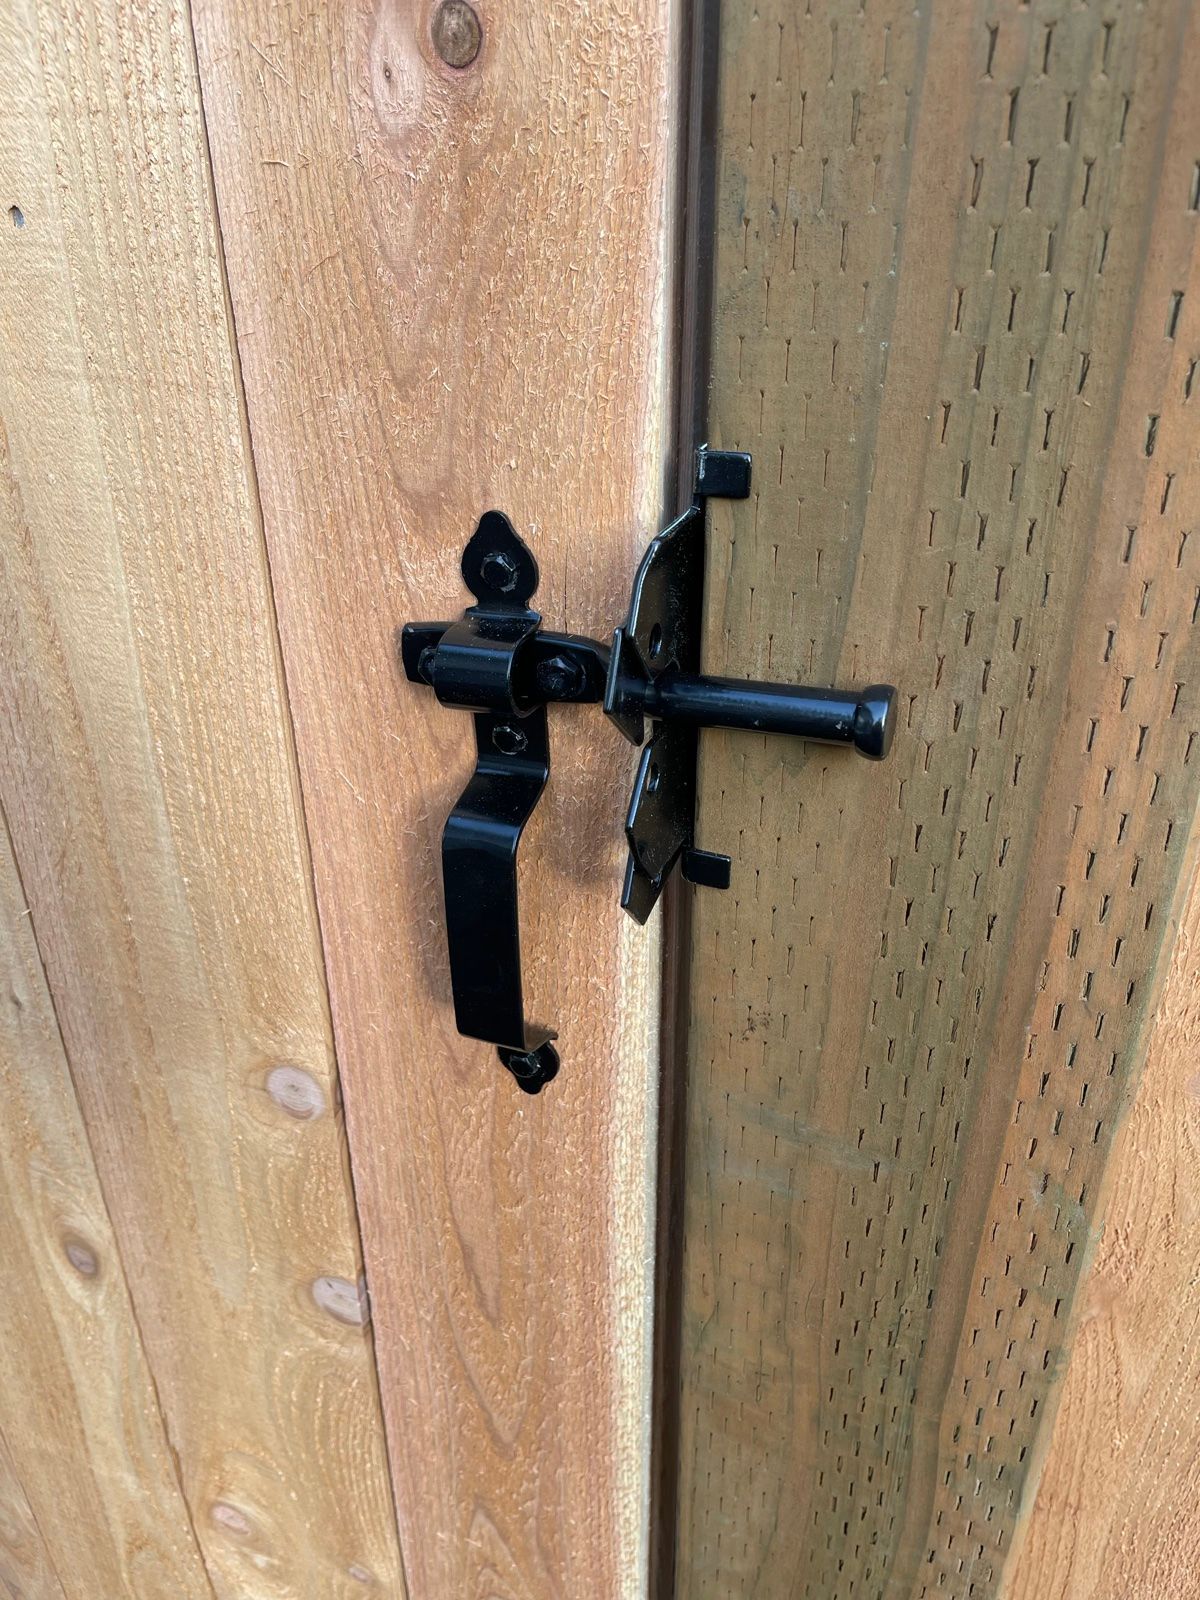
- Heavy-duty flip latch or gravity latch — depending on the gate style and customer preference
Self-closing spring hinges with adjustable tension are available as an optional upgrade — they are not part of our standard hinge hardware.
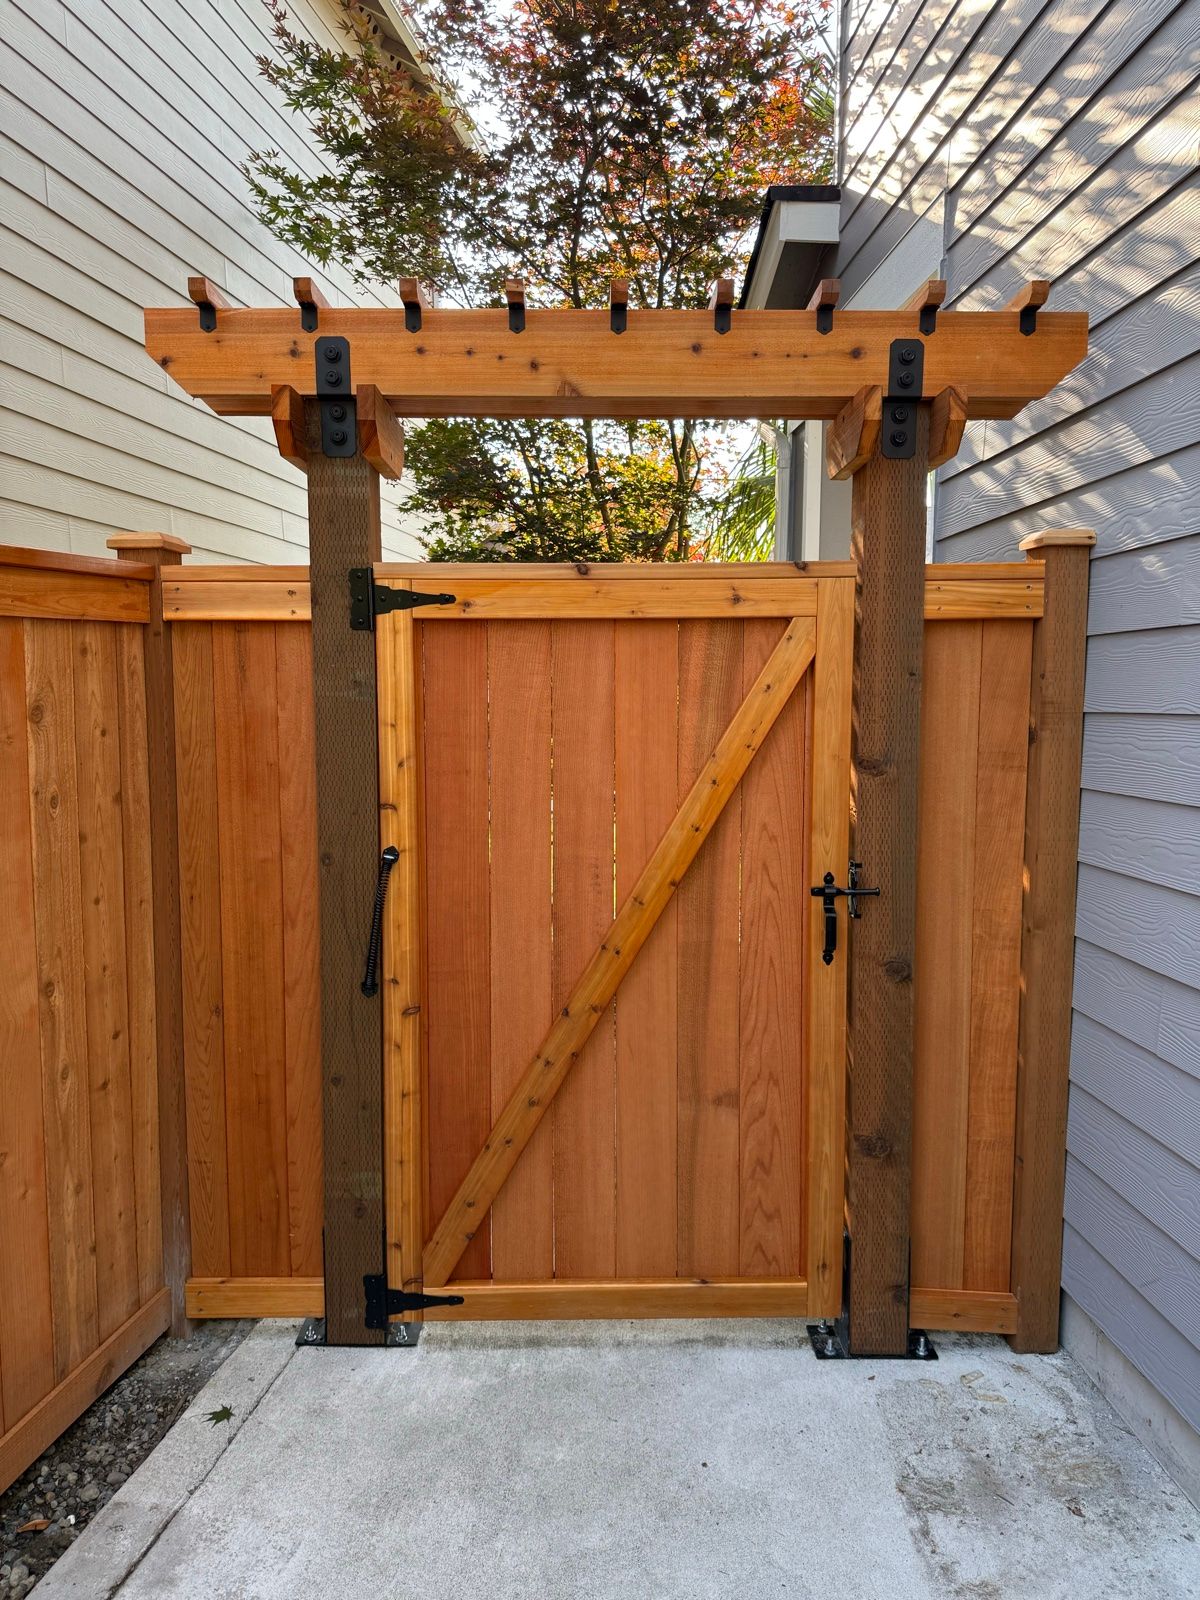
For gates mounted on concrete walkways or pads, we use concrete brackets to anchor the posts. When a gate is bracket-mounted rather than buried, we recommend adding a trellis or arbor above the gate — the lateral strength of the overhead structure compensates for the reduced post depth and keeps the gate rigid.
Watch: How to Operate the Latch
Double Gate Construction
Double gates carry twice the weight and twice the stress. Our double gate frames use 8-inch lag screws — longer than the 6-inch screws in our single gates — because the wider span creates more leverage on every joint.
Each gate in a double-gate pair gets its own full 2x4 cedar frame with compression bracing. The two gates meet in the center with a rotating latch and two drop rods — one for each gate — that drop into ground sleeves to hold the pair firmly in place when closed.
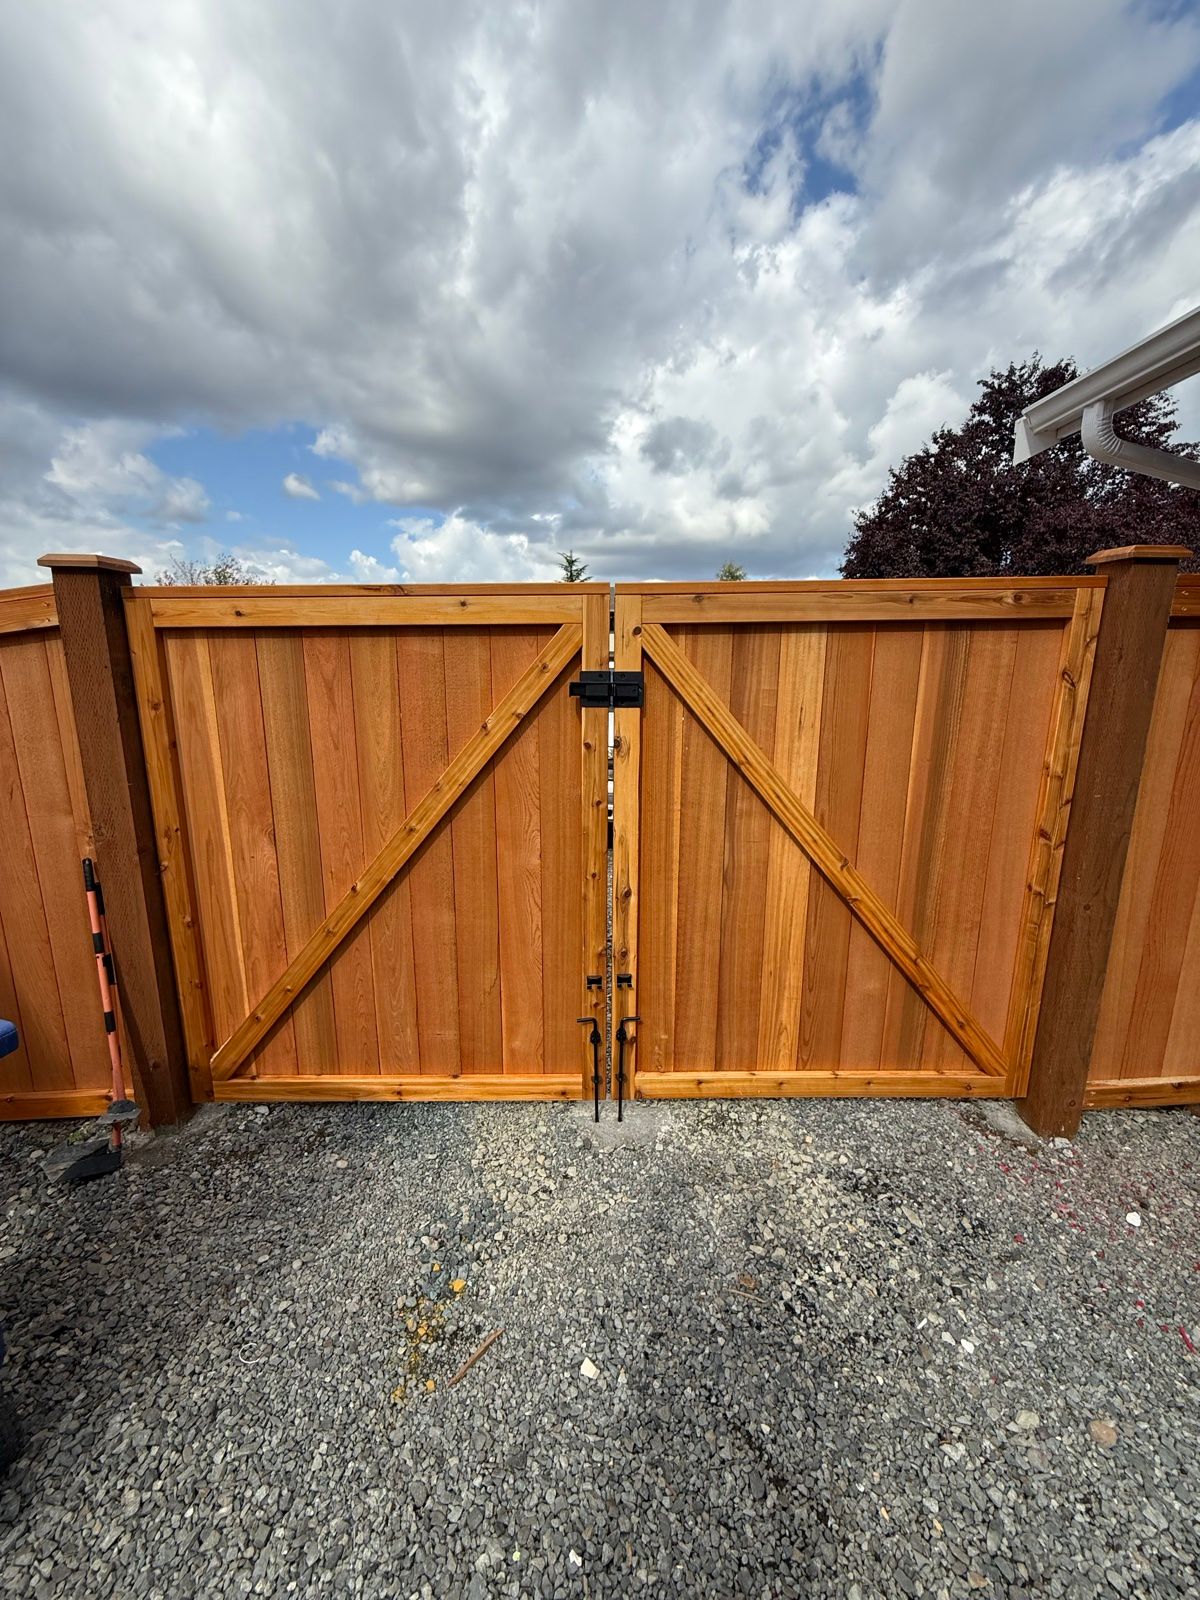
The drop rods are critical. Without them, the double gate acts like a single massive lever — the latch post takes all the wind load and the gate flexes in the center. With drop rods engaged, the load is distributed across four points: two hinges, two ground anchors.
Important
Always engage both drop rods on a double gate when it's closed. Leaving one rod up concentrates the wind load on one gate and can twist the frame over time.
Double Gate on a Driveway
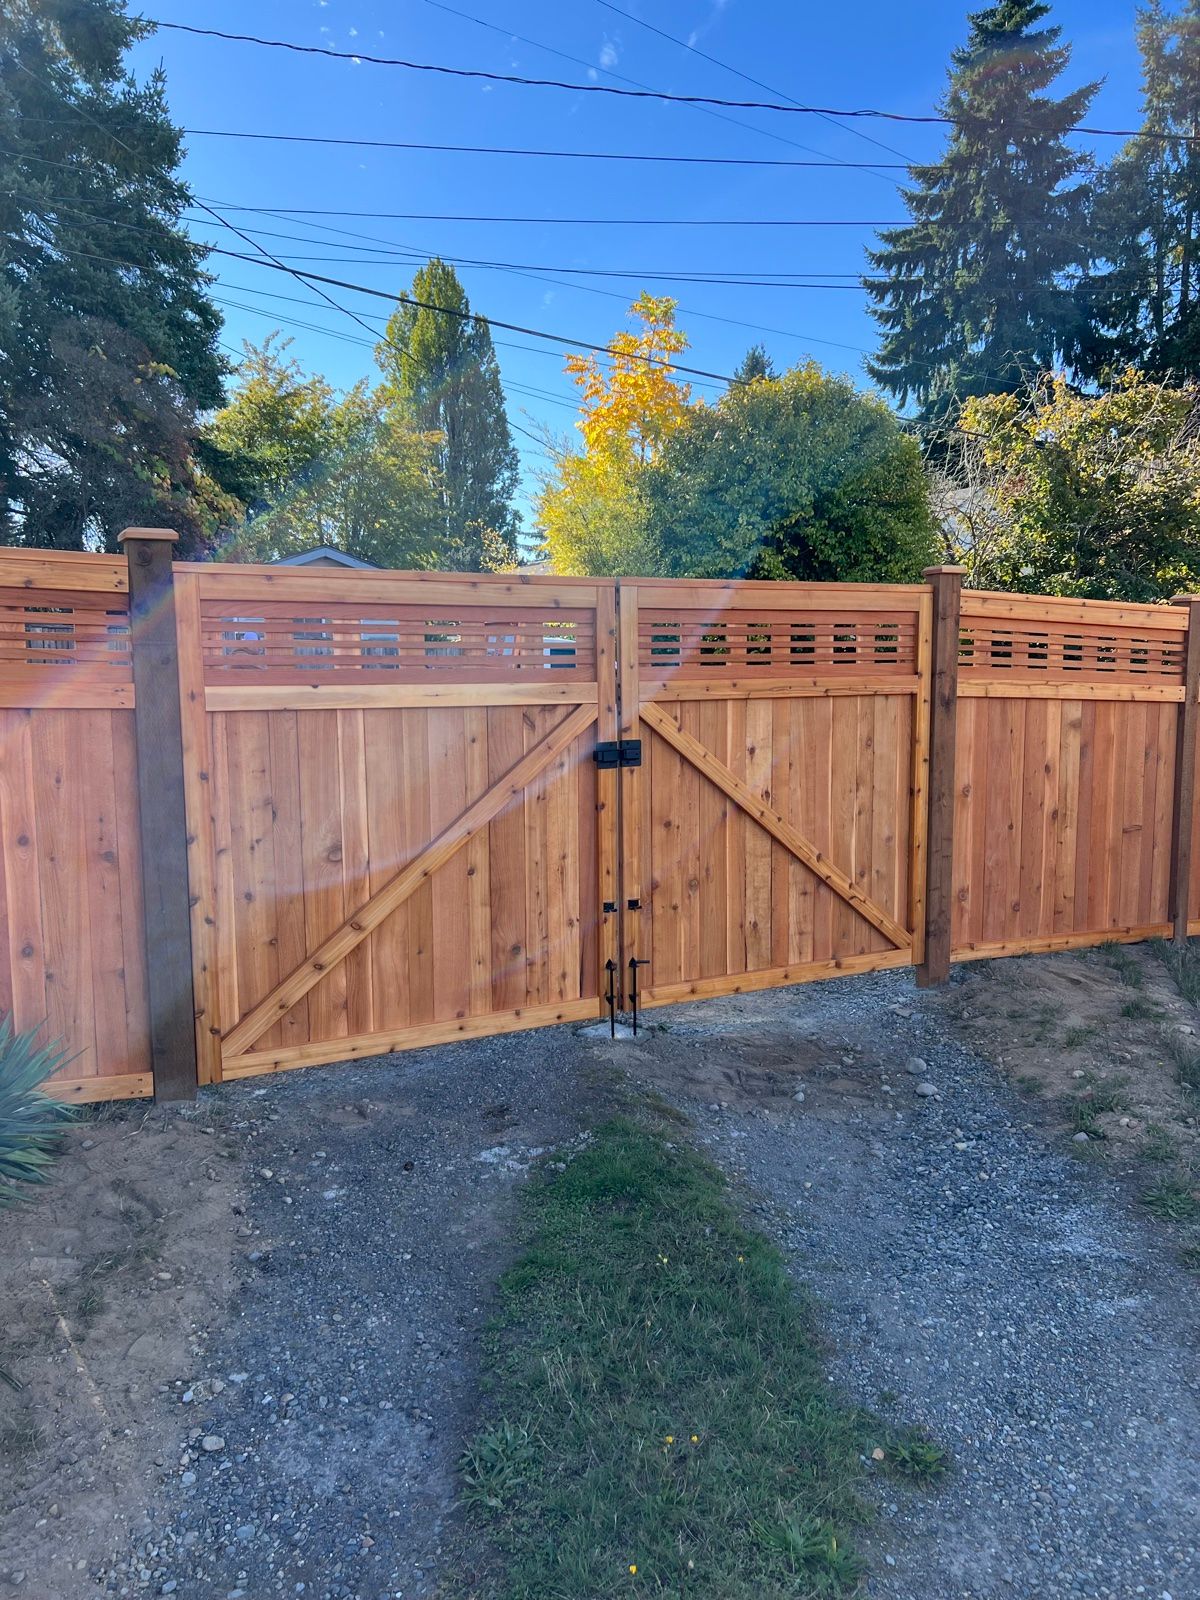
For driveway installations, the double gate is often the first thing visitors see. We build these to handle vehicle proximity, wind gusts, and the occasional bump from a trailer or RV mirror. The frames are identical to our standard double gates — kiln-dried cedar, compression bracing, 8-inch lag screws — but we pay extra attention to the ground clearance and drop rod alignment to ensure smooth operation over gravel, asphalt, or concrete.
Watch: Gate Walkthrough
Gate Hardware Deep Dive
We offer two primary latch systems, each suited to different gate styles and homeowner preferences.
Heavy Duty Flip Latch
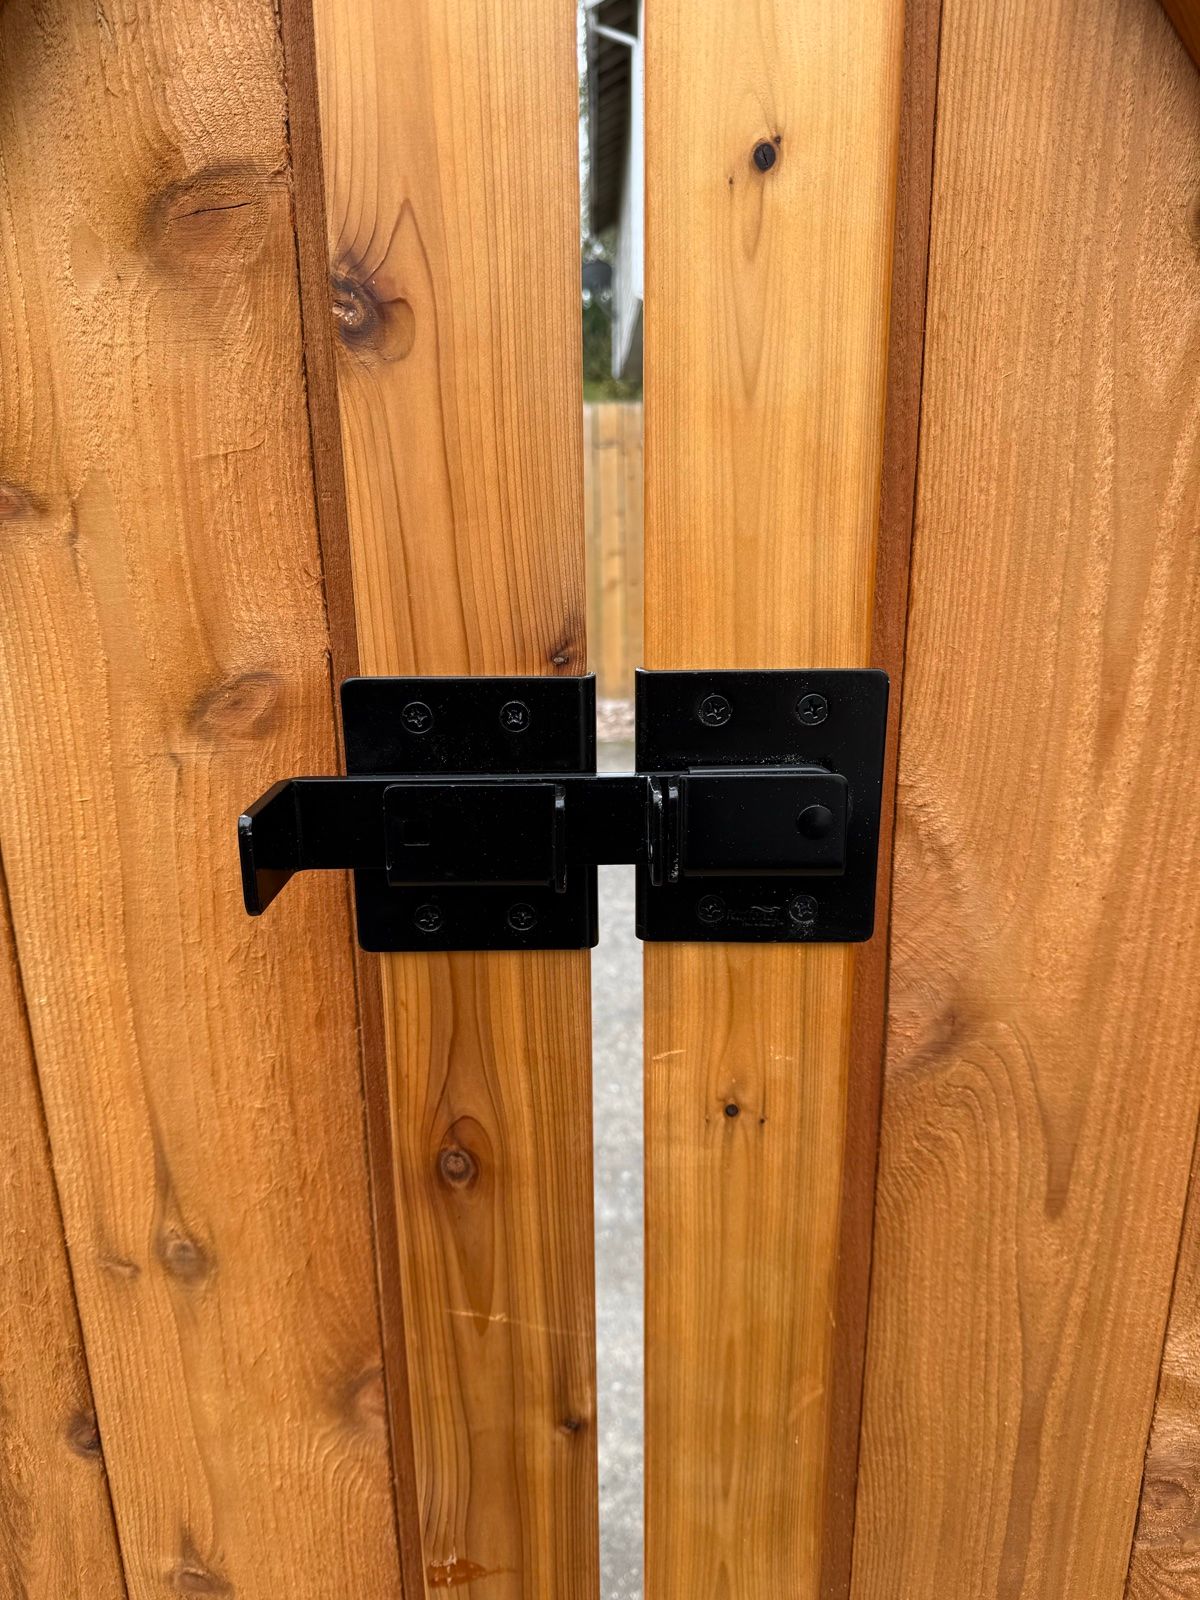
The heavy-duty flip latch is the latch we use most on cedar gates. The bar flips into a catch instead of sliding into a tight keeper, so it is much less likely to bind the way a traditional gate latch can. That extra operating room matters on larger double-gate systems, where cedar moves with the weather and the two gates do not always line up the same way they did on install day.
One of the models we buy is the Everbilt extra-heavy-duty gate flip latch, available at Home Depot and Lowe's.
Gravity Latch
The gravity latch uses a weighted arm that drops into a catch when the gate closes. Lift the arm to open. It's fully mechanical — no springs to wear out — and works equally well from either side of the gate. We recommend gravity latches for gates that get heavy daily use.
Concrete Mounting and Self-Closing Springs
Not every gate post can be buried 24 inches in concrete. When a gate needs to mount on an existing concrete walkway, patio, or driveway pad, we use surface-mount concrete brackets anchored with wedge anchors or tapcon screws.
The trade-off with bracket mounting is lateral stability. A buried post resists side-to-side movement through soil friction; a bracket-mounted post relies entirely on the bracket and the overhead structure. That's why we always recommend a trellis, arbor, or pergola above bracket-mounted gates — the horizontal beam ties the two posts together and prevents the racking that would otherwise loosen the brackets over time.
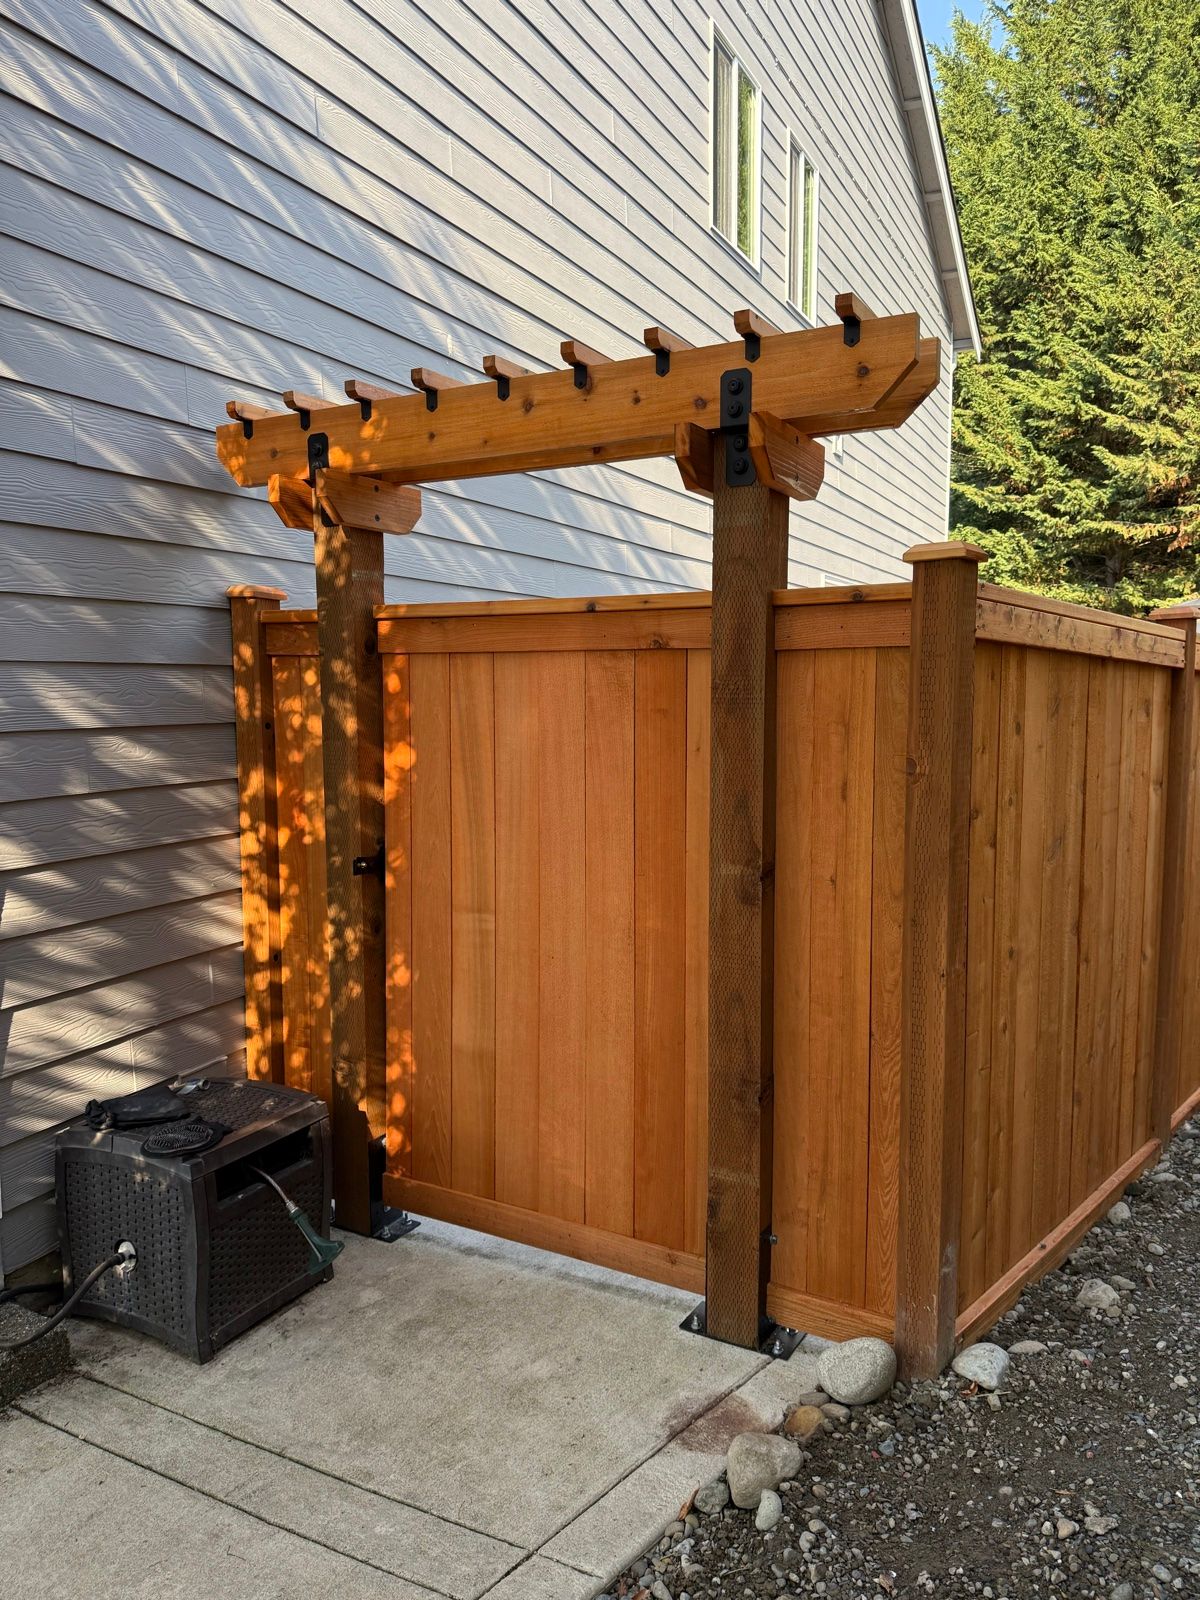
For gates that need to close automatically — pool gates, side-yard security gates, or any gate where a homeowner might forget to close it — we can add a self-closing spring hinge as an optional upgrade. The spring tension is adjustable, so the gate closes firmly without slamming. It is not standard hardware.
Pro tip
If your gate is on a concrete pad and doesn't have a trellis above it, keep an eye on the bracket bolts. Bracket-mounted gates without overhead support can loosen over time as the gate flexes in the wind. Adding a trellis solves this permanently.
Arbor and Pergola Gate Styles
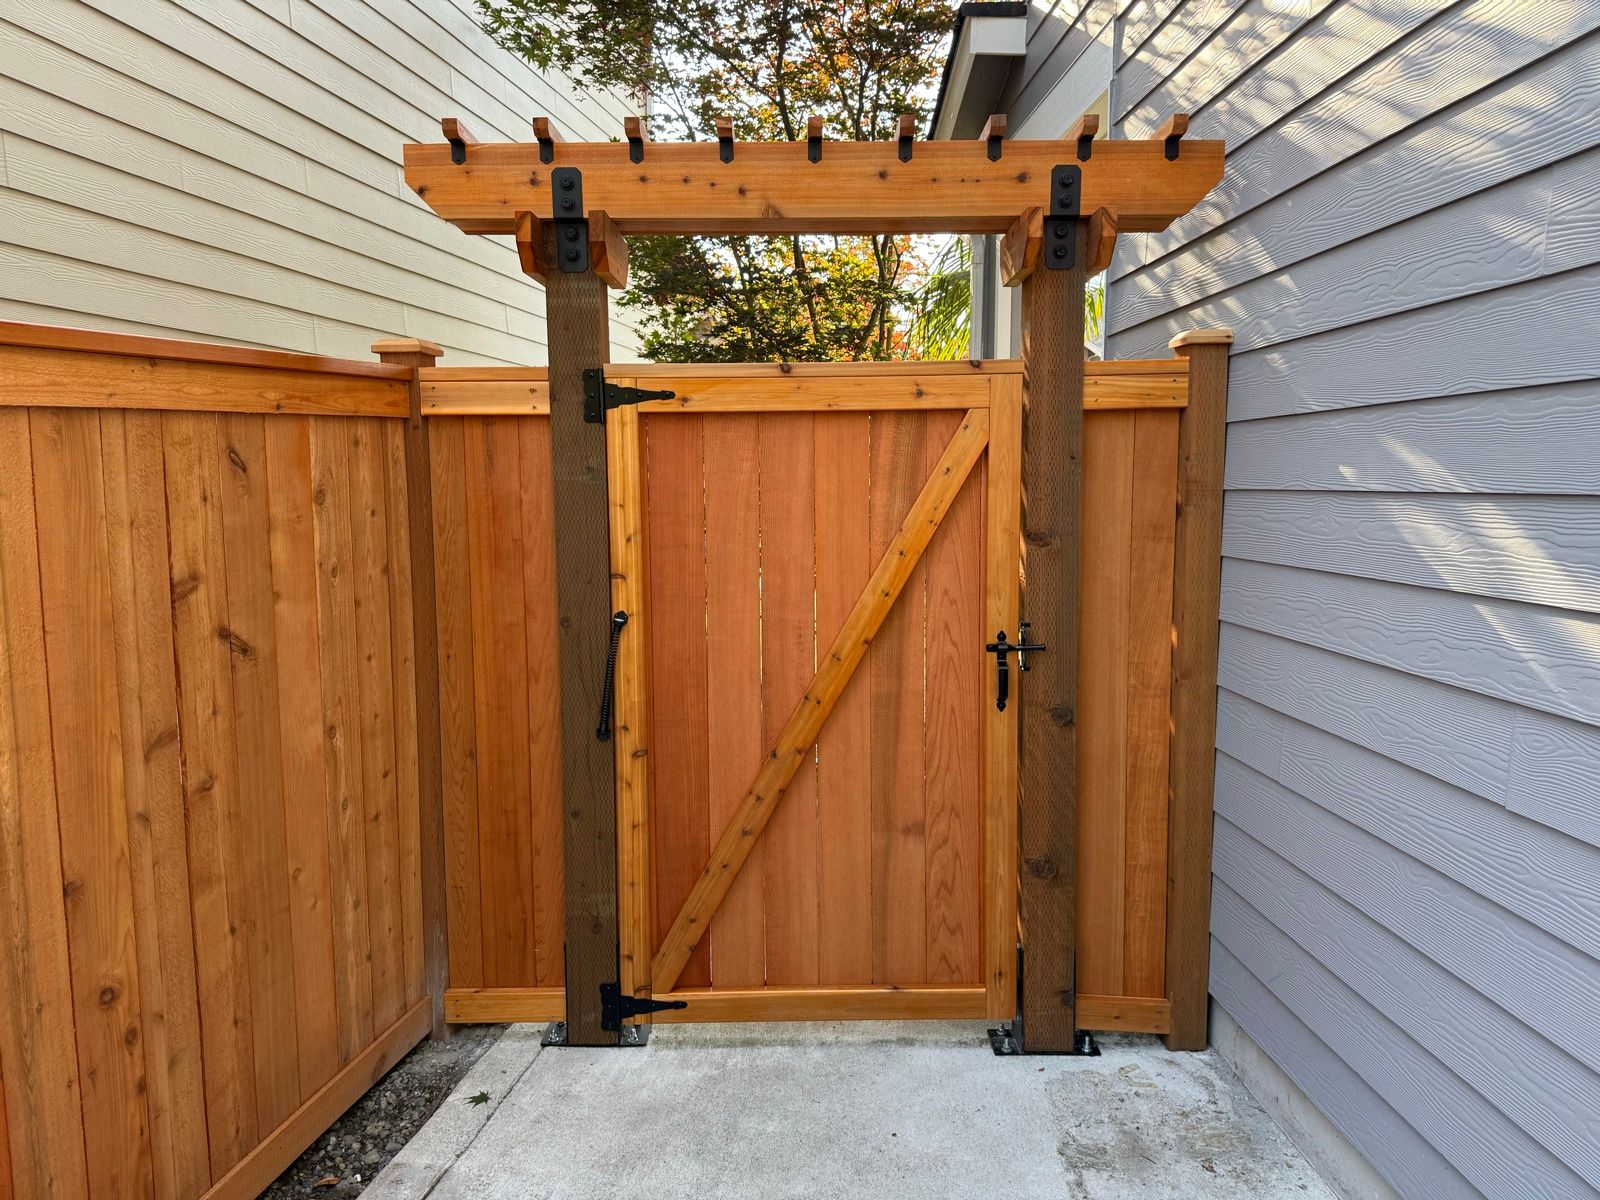
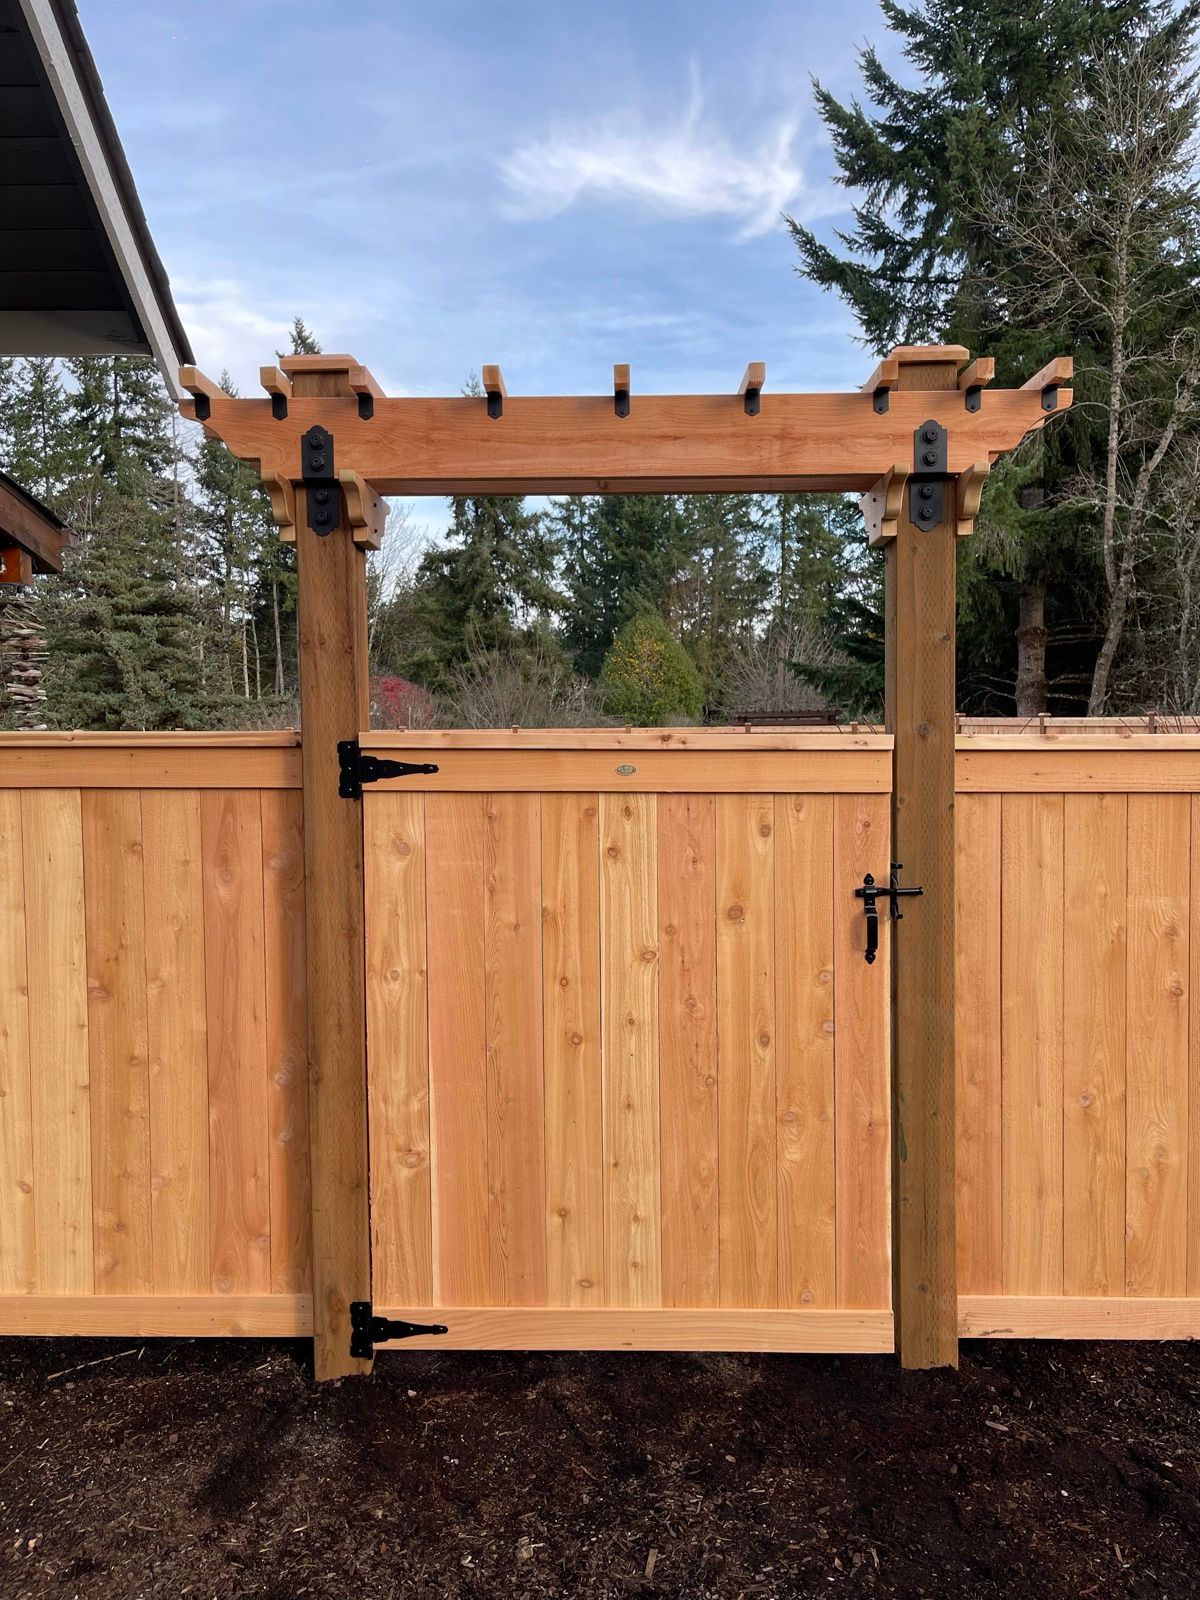
For homeowners who want their gate to make a statement, we build arbor-top and pergola-top gates. These structures add architectural presence to a fence line and provide the lateral bracing that bracket-mounted gates need.
The arbor or pergola is built from the same kiln-dried cedar as the gate frame, with decorative curved brackets connecting the horizontal beam to the vertical posts. The result is a gate that looks intentional — like it was designed as part of the home's architecture, not added as an afterthought.
The Tension vs. Compression Brace Problem
This is the detail that separates a gate that lasts 20 years from one that sags in 3. Z-frame diagonals are usually toe-nailed. That layout is generally compression, but we often find the brace flipped into tension. A tension brace runs from the top of the hinge side down to the bottom of the latch side. When gravity pulls the latch down, the load is on the fasteners, not the wood.
Wood is strong in compression but weak in tension. A brace hanging on screws will creep as those fasteners back out, and the gate sags. A compression brace — bottom of the hinge side up to the top of the latch side — pushes against the hinge post and gets stronger under load.
Real-world failure
We recently replaced a gate in Bothell that was only 4 years old. The diagonal brace ran from bottom-latch to top-hinge — classic tension installation. The gate had sagged 2 inches at the latch side, the homeowner had shaved the bottom of the gate twice, and the latch no longer aligned. The fix was a complete rebuild with a compression brace.
The video below shows exactly why tension braces fail and how compression braces prevent it. If you're evaluating any gate — ours or a competitor's — check the brace angle first.
Watch: Tension vs. Compression Brace — Why It Matters
Why This Matters for Your HOA
If you're submitting a fence and gate proposal to your HOA, construction details matter. HOAs want to see that the gate will look good, operate smoothly, and not become an eyesore or safety hazard in three years.
Our gate construction — with its clean kiln-dried cedar frames, proper compression bracing, and quality black metal hardware — presents exactly the kind of durable, attractive, low-maintenance solution that HOA architectural committees approve. We can provide construction specifications, material lists, and photos for your HOA submission packet.
Get a Gate That Lasts
A MyFence gate costs more upfront than a standard contractor gate. The difference is in the materials — kiln-dried vs. green lumber, lag screws vs. nails, heavy-duty hardware vs. zinc — and in the construction details that most homeowners never see until something goes wrong.
We build gates we'd be proud to have on our own homes. Gates that open smoothly year after year. Gates that don't sag, don't bind, and don't need a second service call in 18 months.
Ready for a gate that actually lasts? Get a free quote or call us at (253) 455-1885.